DIY: Embroidery Headphones / Auriculares de Colores


Antes de irme de viaje les quería dejar un último tutorial para que se diviertan en mi ausencia (: y son.... auriculares de colores!! esto le hice aca en Buenos Aires en mis momentos de ocio jej es super fácil y además no se necesita casi nada!
Before travelling I wanted to share with a tutorial so you don't get bored in my absence (: and this are.... embroidery headphones!! This one I made it here in Buenos Aires in my free time, because they are so easy to made and you need almost anything!
Lo único que van a necesitar son hilos de los colores que quieran y sus auriculares!
The only thing you will need is your thread of your favorites colors and your hedphones!
 Este es el nudo que use, es el mismo que se repite, y la espiral se forma sola! no tienen que hacer nada! (Yo corté mi hilo de 70 cm pero eso depende de cuan largo quieran cada color)
This is the know I used, is the same, you have to repeat it over and over again so to create the spiral! ( I cut my thread of 70 cm but that depends of how much of each color you want...)

 Versión en vivo, para que quede más claro (;
Here is the know "in action" (:
 Y para cambiar de colores cortaba el hilo, y ponía encima el nuevo, y al hacer el nudo dejaba adentro el viejo para ir tapándolo con el nuevo
Here is how I make to change the color:

Y ahí tienen, auriculares abrigaditos para el invierno!!
 Lo que más me gusta, es que como estan gorditos, no se enriedan!!! ya no hay que desatar esos mega nudos antes de escuchar música, son lindos y evitan nudos, que más se puede pedir?
What I love most is that they not tangle anymore!!
 Espero les haya gustado
Si lo hace lo pueden compartir en mi página de Facebook
Nos vemos en unas semanas!
I hope you liked, and if you made yours, you can share with me a photo in my facebook page!
See you in a few weeks!

Love, Agus

Vacaciones de Invierno!! / Holiday's trip!


Y por fin terminé de rendir todos los finales y estoy de vacaciones!! no puedo creer lo rápido que se pasó! y el sábado salimos paraa.....
And finally I finished with all my finals exams and I'm on holidays!! I can't believe how fast pass the year! And this saturday with going away to....

 Viaje totalmente diferente al de China pero igual de emocionante! tengo muchísimas expectativas, para mi Estados Unidos es el país del scrapbooking y de los cupcakes! No puedo esperar a mostrarles las fotos que tomé y las cositas que compré! Si quieren seguir mi viaje en tiempo real, me pueden seguir en Instagram! : @agusyornet
I'm so so excited about this trip!! For my USA is "the scrapbooking country that has pretty cupcakes" I had seen so many movies filmed here, so many photos! I can't avoid to have a lot of expectations!! If you want to join me, follow me on Instagram! @agusyornet


Si conocen alguno de estos lugares y me quieren dejar alguna recomendación de algo para visitar, para ir a compar, etc, son bienvenidos!! O capaz alguna peli que vieron que esta filmada en alguno de estos lugares? 
If you are from any of this places or had been, and want to share with me your experience, favorite restaurant, favorite place, etc, you're more than welcome!! or perhaps just a good movie you seen filmed here...
Love, Agus

Cracked Iphone? Colored!


Estoy en examenes finales, así que no tuve mucho tiempo para hacer un tutorial :(, pero les quería compartir esto que descubría hace unos días que me encanta! Es impresionante a la cantidad de gente que se le rompe los iphones!! Y no se quien habra tenido la brillante idea de colorearlos, pero le pusieron muy buena actitud a la situación (:
Im in finals exams season, so I didn't have enough time to make a tutorial :( but I want to share with you something that I'm lovin it!! Colored Cracked Iphone, I dont know who got the idea, but the definetly  "make the best out the worst situation!" lol
Image Source: Hey Peasants

Me encanta como todos muestran felices sus iphones una vez que se les rompió y lo colorearon (: Estos son unos de mis favoritos, estuve investigando y se puede colorear con Sharpies, resaltadores o colorante en polvo:
I love how all the people share super happy their colored cracked iphone (: I had been investigating, and you can colored with sharpies, highlighters or food coloring! This are some of my favorites:

1//2//3//4//5//6

Curioso, verdad? Ya sabes ahora si se les rompe su iphone, o aun amigo, no se pongan tristes y coloreenlo, al menos va a estar lindo hasta que le cambien la pantalla (:
Mañana termino de rendir y les cuento a donde me voy wohoo!!
So now you know, if you cracked your iphone, don't cry and colored!! unless it will look pretty for a while (:
What do you think of this crazy idea? have you ever cracked your iphone?

Besos, Agus

Sugar Cookie Day! - Muffin Fondant Cookies


Leí por ahí que hoy era el día de las galletitas de azúcar en Estados Unidos (este país tiene un día para cada comida!! -me encanta-) y me acordé de las galletitas que hice para navidad para mis amigas! Así que acá les muestro algunas fotos:

I read somewhere that today was "Nationa Sugar Cookie Day" in USA (I love this country it has a day for every food!) and I remembered the cookies I baked for my friends last christmas! So I decided to share some photos with you:
Aclaro que yo solo hice la galletita y mi mamá fue quién le hizo la decoración, con fondant de torta y confettis redonditos, la formita la hizo con el mismo cortante! (Pueden ver las tortas que me hizo para mi cumple acá)
I baked the cookies and my mom was the one who makes the decoration with cake fondant!, she made it using the some cookie cutter I use for the cookies! (You can see the cakes she makes here)
Nunca se como envolver la comida para regalar, siempre terminamos poniendolas en estas bolsitas transparentes, pero esta vez decidí hacerle un pequeño circulo de cartulina con washi tape para que no se note la grapa de la abrochadora y quede más lindo!
I never know who to package food, with always end up putting it in this plastic bags because it keeps them fresh, but this time I decided to add a little detail with a circle made of cardstock and some washi tape to cover the staple and make it look prettier (:

Acá esta la receta por si se les antoja alguna galletita después de esto (:
Here is the recipe I use in case you are feeling like baking after this (:
Espero les haya gustado!

Love, Agus

PD: los cortantes los compré en un negocio en Irlanda, pero la verdad que no me acuerdo como se llamaba... pero acá y acá encontré unos super parecidos!
PS: I bought the cookie cutter in Irland, but I really don't remember the name of the shop... but I found some really similar here and here!

Hecho en China! - Compras China/ China Haul


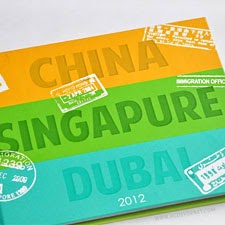
El tiempo se me pasa volando y ya estamos por viajar a nuestro próximo destino y aún no les mostré las compras que hicimos en China como les había prometido! (Este es el post de mi viaje a China por si lo quieren leer) Dividí las compras es dos, souvenirs y articulo de librería! Así que empezemos por los souvenirs! (lo mejor para lo último jaj)
Times flies and I about to make my next trip and I haven't show you what I bought in my trip to China!! I divided my China Haul is two, souvenirs and stationary! So lets start with the souvenirs (and leave the best for the end lol)

Estos son regalos que nos hizo la familia de China, yo creo que no podrían haber elegido mejor los regalos! Decidí tomarle una foto donde esta todo cerrado para que puedan ver que linda es la presentación que tienen!! Realmente admirable:
This are the present that our Chinese family made us, I think the couldn't have choose better gift!! I decided to take a photo with packages unopened so you can see how pretty is the presentation! 
Y ahora veamos que hay dentro!: empezando de la izquierda, hay un colección de tés (increible la presentación!! como les dije jaj) Después viene un peine y un abanico clásico. Y por último nos regalaron una billetera y un collar que son de diseños más modernos, sale un poco de lo comun pero conserva ese toque chino:
Now let's see what is inside! Starting from the left, we have a collection of tea (amazing packaging!) then with have a comb and a hand-fan. And to the right there are a necklace and a waller, this are made by designers and are more modern but keeping the chinese essence:
A mi en especial me encanta el peina porque parce de princesa! Tiene un diseño tan lindo!
My favorite is the comb such a beautiful shape, and I feel like a princess when I used :) lol Such a pretty design!
Y estas son algunas cositas que compramos nosotros! Siempre compramos postales para poner en albúm y buscando buscando encontramos unas postales que eran super tiernas!! y salían de las típicas postales con la foto. Después compramos unos palitos chinos "con ayuda incluida", son palitos para aprender, super tiernos también! En Beijing, ciudad productora de perlas! me compré unos aritos de perlitas! porque tenía unos de plásticos hasta el momento jaja. Mi mamá se compro se una colección de muñequitas con distintas vestimentas típicas de China y por último compramos un té en un templo en Shanghai:

And this are some of the things with bought ourself. We always bought postcards to put in the album, and after searching and searching with finally found some that weren't the clasic one with the tittle and the photo! We also bought some chopsticks "with help included", super pretty and super useful to learn how to use chopsticks! In Beijing, I bought my first pearls earing! and my mom bough a collection of tiny dolls with their classic chinese clothing. And in Shanghai we bought a special tea:

Y estos son nuestro nuevos integrantes en la repisa de casa, el gatito y el pee-pee boy son mis favoritos!. El pee-pee boy, es un muñequito que te ayuda a saber la temperatura correcta para el té, pueden ver un video que hice acá
And this are our new members of our shelf! the kitty and the pee-pee boy are my favorites! The pee-pee boy tells you when the water is in the right temperature for the tea when he pee, super fun toy!, you can see a video I made about here

Espero les haya gustado y no puedo esperar para mostrarles la Parte 2! 
(al menos a mi siempre me da curiosidad saber que compra la gente en sus viajes jaja)
I hope you like it and I cant wait to show you Part 2!
Besos,
Agus


How to make a perfect watercolor background/ Fondo en acuarela


Siguiendo con los tips! Hoy les traigo un tutorial de como hacer un fondo en acuarela con muchos colores como el que hice en esta tarjeta
So today I bring the second crafty tip! And it is a tutorial on how to make the perfect watercolor background for your cards just like the one I did here: (scroll down for the video)
 Lo primero que van a necesitar es elegir el papel correcto, tiene que ser un poco poroso y grueso!
The first thing you have to do is choose the righ paper, it has to be thick and with pores (if you have a watercolor paper is the best option if not choose one according to this two characteristic)
 Lo segundo es elegir los pinceles de acuerdo al tamaño de la cartulina que estemos usando
Y por último para creer este efecto es muy importante usar mucha agua (tampoco demasiado) esto esta mejor explicado en el video.
The second thing is choosing the righ brush for the righ paper size, you will need one really big to wet the paper with water at the beggining and then another smaller one to add the color. Making the cardstock wet is the essencial for this technique! 
As well as using "a lot" of water when applying the watercolor, more water than the regular watercolor but not that much

Y finalmente después de todo esto este sería el resultado:
And finally this would be the result:
 Acá les dejo el video para que vean desde cero como lo hice, porque en verdad es mucho más sencillo de entender con un video que con imágenes.
Here is a video from the beggining to end, is much easier to understand! (sorry is in Spanish but is worth watching to see the technique)
No se frusten si el primer fondo que hacen les queda feo, que el segundo les va a quedar mejor!!
Espero les haya gustado!
I hope you like it!
You can show me your results in my Facebook Page
Love,
Agus

Photonica | Diseño gráfico y web
Copyright © Agus Yornet Blog