Showing posts with label tutorial. Show all posts

DIY: Coffee Beans Frame / Tutorial: Cuadro granos de cafe


After a time, a new DIY tutorial! The truth is that I have seen this frame in a coffee shop and I love it. So I decided to recreate it for you! This can be a perfect gift for a coffee lover or a new item to decor your home. 

Después de un tiempo, vuelvo con un tutorial! La verdad que vi este cuadro en una cafetería acá en Buenos Aires (a ver si pueden adivinar cual es!) y me dieron ganas de recrearlo con un tutorial para ustedes. Puede ser un regalo perfecto para algún/a amante del café o para decorar vuestras casas :)

A coffee beans frame DIY tutorial, perfect for home decor or a gift for coffee lovers.

A coffee beans frame DIY tutorial, perfect for home decor or a gift for coffee lovers.
You will need: coffee beans (of course), a frame wih depth , a silicone sealer, white vinyl and I use a Silhoutte Studio Machine, but since they are just letters maybe you can find an alphabet sticker! (also I had to paint my frame...)  

Lo que van a necesitar es: un cuadro con fondo (si están en Bs As yo compré el mio en Once), Fastix para pegar todo, papel contac blanco (si consiguen stickers de letras blancas se ahorran de este paso cortando el contac). Mi cuadro vino sin pintar así un paso adicional fue pintarlo.

A coffee beans frame DIY tutorial, perfect for home decor or a gift for coffee lovers.

So the first step is fill it with beans, I think I use around 300grams, it depends on how depth is your frame... I recomend sifting it a bit so you remove any dust that may have. And if you also need it to paint the frame as me, let it dry for a while, if not the beans will stick to the paint.

Como hacer un Poster personalizado / DIY Custom Poster


In the last couple of moth I have been obsessed with calligraphy, as I got few time during the day because of my studies, calligraphy is the one thing that require so few things and is so satisfing and beautiful (at least for me...)

The other day I post this image on Instagram, and yep... most of my study break end up at something like that...

So one day I was really hurry for making a birthday gift I have in few days, I wanted to do something really representative... and I has this quote that I think really identify my friend and decided to make it into a poster...

Ultimamente he estado obsesionada con la caligrafía y debido que generalemente tengo poco tiempo durante el día porque me la paso todo el día en la facu o en casa estudiando, la caligrafía es de esas cosas tan lindas que requieren tan poco con un papel y una lapicera ...

El otro día publiqué esta foto en Instagram por ejemplo... sip... así terminan la mayoria de mis cuadernos cuando estudio jaja.


How to make a Custom Poster


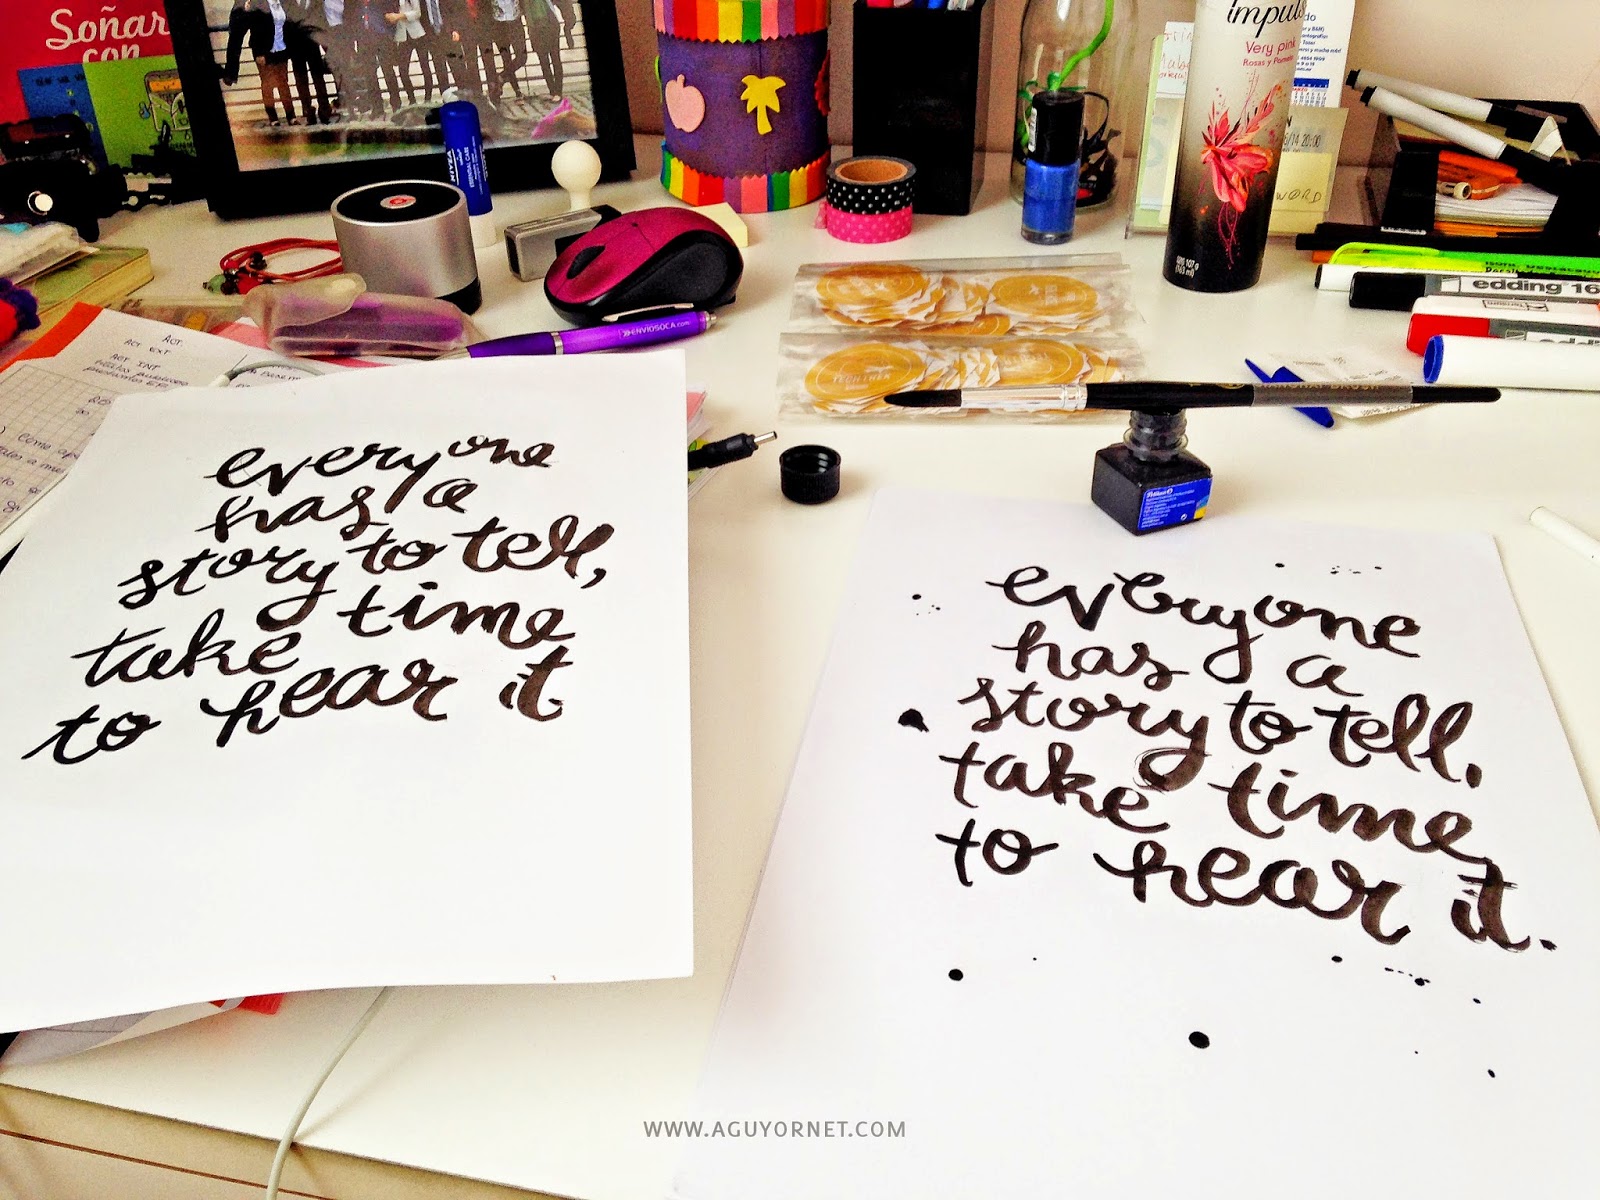
This is super easy and fast idea to make the perfect gift! The first thing you have to do is choose the quote you want and start writting in down, I use black ink and a brush, and regular paper. There is not much to explain here is just practice and do it over and over again until you like the result.

I wrote it down five or six times, and this two were my favorties. Sometimes one page never get to be perfect but as we are going to edit it latter you can have two and mix the letters/words you like of one with the other.

Esta es una idea super y fácil y sencilla para hacer un regalo, más que todo porque es super personalizable!

Lo primero que tienen que hacer es elegir la frase que quieren, y simplemente empezar a escribirla, yo use papel común de impresora, tinta china y un pincel. Y acá la verdad que no hay mucho para explicar es simplemente escribirlo una y otra vez hasta que estén satisfechas con el resultado...
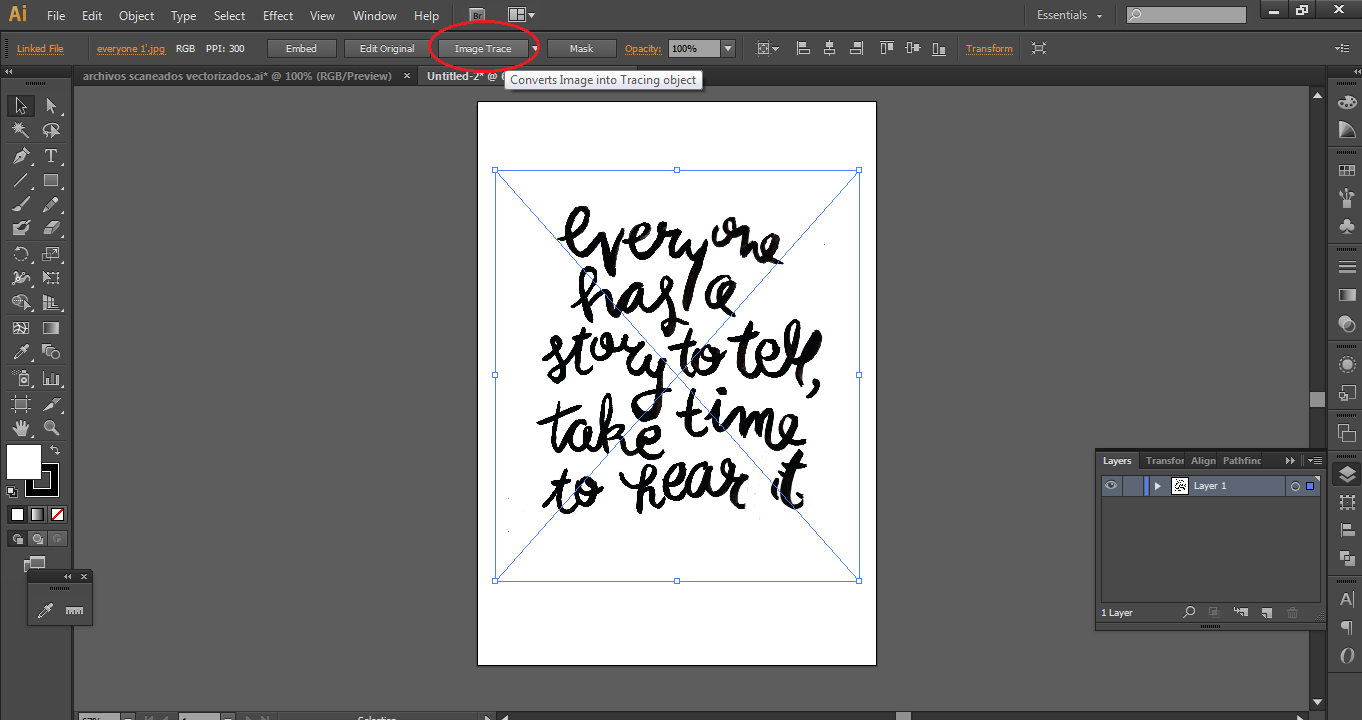
Brush letteringHere is when the magic happen, you scan both of the pages, and insert it into Adobe Illustrator. (If you have two pages you have to do it separately for both). First, you will need to create a new project at Illustrator with the size of your poster, and then go to, file> place> and select the image scanned. Once you have your image in Illustrator, selected and click on "Image Trace"

Acá es cuando la magia sucede! Una vez que lo scanean, abren Illustrator y crean un nuevo proyecto con el tamaño del poster, y después van a File > Place y seleccionan la imagen que acaban de escanear. Y este basicamente es un tutorial de como vectorizar imagenes, y porque es importante vectorizar se estarán preguntando! Pues la razón es que las imagenes vectorizadas no se pixelan, entonces si queremos imprimir con buena calidad y encima algo tan grande como un poster es más que esencial que este vectorizado!

Entonces una vez que tienen la imagen en illustrator hacen click en "Image Trace" 
Como vectorizar en adobe illustrator

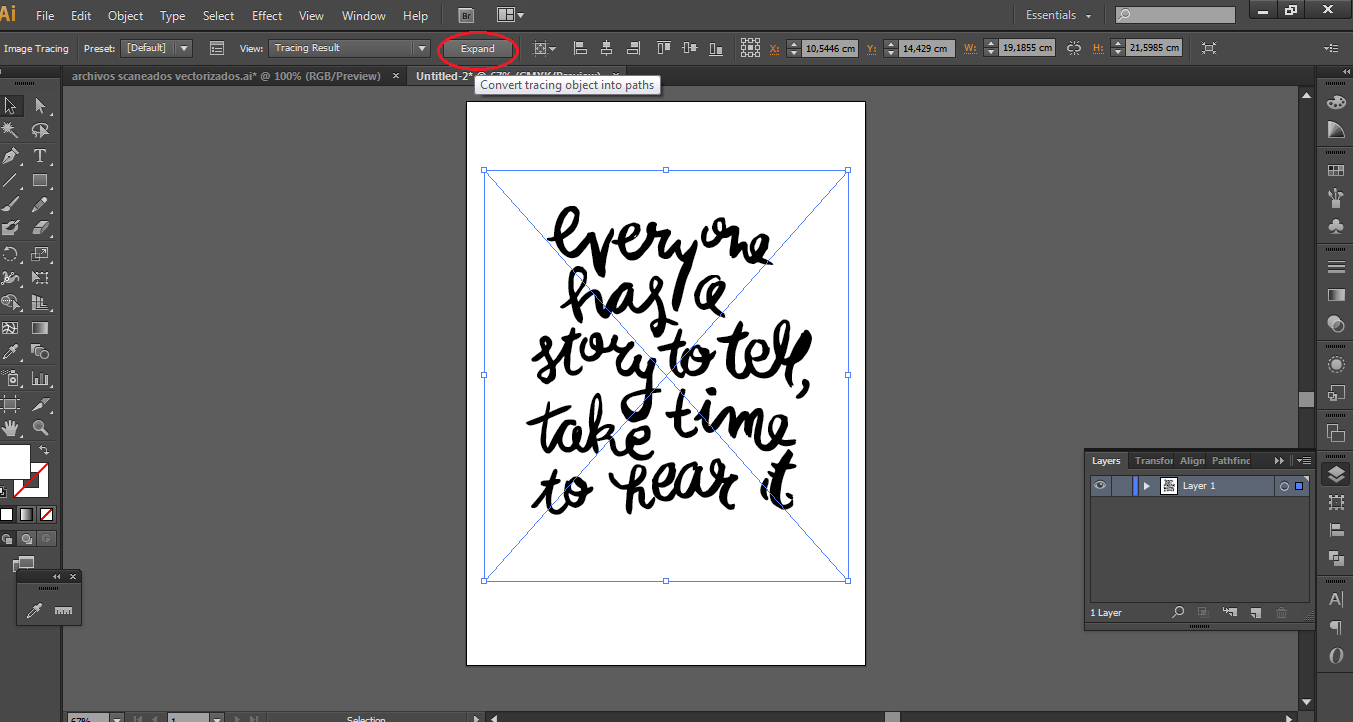
After that click on "Expand"
Después en "Expand"
Como vectorizar en adobe illustrator

Your image should look something like this, now everything on the image you scanned is a vector, even the white space.
Su imagen se debería ver algo como esto, eso quiere decir que todo lo fue scaneado en esta imagen ahora esta vectorizado, incluso los espacios en blanco.

Como vectorizar en adobe illustrator

So as we don't need the white space, only the black words, we are going to ungroup it, and start selecting the white part we don't want and delete them

DIY Knitted Lamp


Hace tiempo por el blog de Vero Mariani, llegué a estas lamparas. Me encantó la idea que tenga el cable de color! y me quedé pensando en como podía hacer para hacer una parecida... En eso me acordé que de chica tenía un tricotin en el que tejía cordones de colores sin mucho uso...

Sometime ago I remeber seeing in Vero Mariani Blog, this lamps. I love the color cable! and I start thinking how I can do a similar one... Then I remember that when I was little I used to have a tricotin where I french knitted

DIY Knitted Lamp


Los materiales que use fueron: el cable y el portalámpara, un destornillador para poner el portalampara, lana, el tricotín y un crochet chiquito.

The things I used were: cable, a lampholder, a small screwdriver for the lampholder, the tricotin, wool and a small crochet


Siempre use el tricotín ya sea con lana sola, o hilo para hacer pulseras; pero pensando en esto se me ocurrió combinarlo con el cable... y efectivamente funcionó!

I always use the tricotin just with wool but this time thinking on the lamp I decided to mix both! and luckily it works perfect!

French knitting tutorial for making a knitted lamp
Pasé el cable por el medio y tejí alrededor normalmente como siempre, y de a poco iba saliendo el cable tejido :) muchó mas gordito y compacto por la lana que usé!

I pass the cable trough the middle and start knitting like usual, and slowly the cable come trough beatufly knitted :) much stronger because of the wool!

French Knitting tutorial to learn how to make a knitted lamp

Después cuando ya quise terminar, lo fuí cerrando (que es igual que cuando se teje pero dejas de pasar la lana, entonces te van quedando menos)

When I wanted to finish, I start closing it (is the same that when you knitt but without passing more wool)

French Knitting tutorial to learn how to make a knitted lamp

Cerramos y pasamos el tricotín hasta el final para sacarlo del cable

Once closed it, we pass the tricotin trought the cable to take it out.

French Knitting tutorial to learn how to make a knitted lamp

Así quedaría la punta donde empezamos que es donde vamos a poner el portalámpara normalmente

That is where we started, here you put the lampholder

French Knitting tutorial to learn how to make a knitted lamp


Espero que les haya gustado! y sepan que pueden compartir sus proyecto finales en mi fan page :)

I hope you like it! Remember you can always share you crafts with me in my fan page!

Lampara tejida con tricotin

Love, Agus

Ribbon Twist Ties - Ordenando cables


The other day I found this amazing tutorial on how to make this cute Ribbon Twist Ties, and I knew I have to do it!! I have so many cables around my desk, and this is such a nice way to organize it and keep it tidy


Is super simple to make them! You put a strip of ribbon, glue, wire and the other ribbon strip!
[Source: Lynn + Lou]


I hope you found as helpful as I did :)
Love, Agus


Photonica | Diseño gráfico y web
Copyright © Agus Yornet Blog