Taking care of brushes / Cuidado de Pinceles


Yo fuí a un taller de pintura por 13 años, la misma cantidad de años que toda la escuela primaria y secundaria. Eso es, muchoo tiempo. Y cuando llegaba Diciembre y era época de vacaciones, era el momento de llevarme mi caja de pinceles del taller a casa, para hacerle un service a todos los pinceles que trabajaron todo un año y queden listo para otro año intensivo de pintura.

I went to painting school for 13 years, that's the same amount of years as primary and high school together, a lot of time!. And when it come to December, I remember it was time to take my brush's box from the studio and bring them home, so I can do them a full "servis" and let all set up for next year

 Y esto como empezaba? Lo primero que hay que hacer es limpiarlos bien con jabón blanco para ropa, para que todo resto de pintura se vaya (yo pintaba en óleo, así que considerando que ya sacamos todo lo que se podía sacar con aguarrás)

This were the step I follow: First I started cleaning it with whitesoap (the same you use to wash cloth), with this the idea is to get rid off all the paint left it has (I used to paint with oil paint)

Una vez que están bien limpios en una olla con agua hechar un buen chorro de vinagre, y poner a hervir todos los pinceles. Dado que el vinagre tiene feo olor y estamos encima hirviendolo, haganlo con las ventas abiertas o si pueden mejor afuera...

Once they are clean, in a saucepan with water add a small amount of vinegar, and put your brushes until it boils. But dont get you eyes off them and move the brushes for time to time, because we dont want them to get burn with the bottom of the saucepan!

Ponemos todos los pinceles ahi hasta que hierva y después lo sacamos, muevanlos un poco no queremos que se quemen todos en el fondo de la cacerola...

Cuando los sacan los enjuagan con agua y ahora tenemos los pinceles super limpios y con las cerdas super suaves pero que tienen un aspecto similar a este:

When the water with vinager boils, take the brushes away, clean it with water, and now you have super clean and smooth brushes that look something like this...

Entonces queda devorverle la forma, lo mojamos un poco y con un servilleta lo envolvemos lo más apretado podemos, y así lo ponen debajo de algo pesado, una caja, una enciclopedia, etc.

So now is time to give it shape, moisten the point of brush with water and with a tissue paper wrap it as tight as you can, and leave under something heavy like a box or a encyclopedia.

Después de uno dos días, lo sacan de ahí, le sacan el papelito y deberían haber quedado como nuevos otra vez :) Sino lo pueden hacer otra vez, y dejarlo unos días más

After one or two days, when you unwrap it they should have a nice shape, if not do it once again for a few more days.

Un buen tip, es que cada vez que laven sus pinceles y estén por guardarlos para que les quede una punta perfecta, hagan este gesto con la mano y que les queda perfecto.

A good trick: after every time you clean your brushes you can give it a perfect shape with your hand like this:

Espero que les sea útil! Le pueden alargar la vida varios años a sus pinceles así :)
Tienen algún truco ustedes?

Hope you find it useful! and if you have any trick to take care of your brushes please share it with me in the comments :)

Love, Agus 

9 Cafés de Buenos Aires


A lo largo del año pasado fuí visitando por distintos motivos distintos cafés por Buenos Aires, y no dejo de sorprenderme de la cantidad de cafecitos super lindos que hay por toda la ciudad! Creo que te la podes pasar un año sin repetir siempre el mismo. Así que acá mi review de 8 que visité en el 2014:


1. COCU

Ir a Cocu es como transportarse por una tarde a Francia, entrás y hay un olorcito a baguette recién horneado, sumale a esto que todos los que atienden son francesés y la callecita donde esta es de lo más tranquila. Tienen la opción "merienda para dos", que es como para 3, en serio, es muchoo. Creo que lo que más me quedo grabado de este lugar fueron las tostadas que trajeron en la merienda, era un pan super raro que estaba buenísimo. (Un detalle, no aceptan tarjeta...)


Dirección: Malabia 1510, CABA


2. BARRIO CAFETERO

Barrio cafetero es una cafetería para comprar café para llevar, ahora tiene dos locales! uno en Florida y otro en Reconquista!. El café que hacen es riquísimo, el local es chiquito y super familiero pero con más que todo con muchísima buena onda. En verdad saben de café acá. Vengan a probarlo, porque es una buena alternativa para romper con la rutina de Starbucks y probar un buen café.

★ Mejor café para llevar!

Barrio cafetero cafeterias en buenos aires Dirección: Florida 833 / Reconquista 519, CABA
Página: https://www.facebook.com/pages/Barrio-Cafetero/


3. LE PAIN QUOTIDIEN

Bueno, Le Pain, que más decir, conozco solo dos el que esta cerca del Malba y el que esta en Recoleta, y me encanta todo, las mesa comunitaria que siempre tienen, el capuccino, los panes que tienen a disposición, que el lugar sea tan acogedor. La primera vez que fuí estaba lloviendo y era invierno y entrar ahi para tomar un capuccino caliente me dejo de los mejores recuerdos ❤


Dirección: Armenia 1641, CABA (hay dos más pero ese es el de las fotos)
Página: https://www.facebook.com/LePainQuotidien

4. MOOI

Mooi está en Belgrano, lugarcito super lindo, cuando fuí estaba llenísimo así que no pude apreciar mucho el lugar... Pero tuve la oportunidad de probar sus cosas en Buenos Aires Market, y la verdad que la pastelería es su fuerte! (los licuados no fueron tan wow)


Dirección: Cuba 1985, CABA
Página: Mooi Restaurant


Como hacer un Poster personalizado / DIY Custom Poster


In the last couple of moth I have been obsessed with calligraphy, as I got few time during the day because of my studies, calligraphy is the one thing that require so few things and is so satisfing and beautiful (at least for me...)

The other day I post this image on Instagram, and yep... most of my study break end up at something like that...

So one day I was really hurry for making a birthday gift I have in few days, I wanted to do something really representative... and I has this quote that I think really identify my friend and decided to make it into a poster...

Ultimamente he estado obsesionada con la caligrafía y debido que generalemente tengo poco tiempo durante el día porque me la paso todo el día en la facu o en casa estudiando, la caligrafía es de esas cosas tan lindas que requieren tan poco con un papel y una lapicera ...

El otro día publiqué esta foto en Instagram por ejemplo... sip... así terminan la mayoria de mis cuadernos cuando estudio jaja.


How to make a Custom Poster


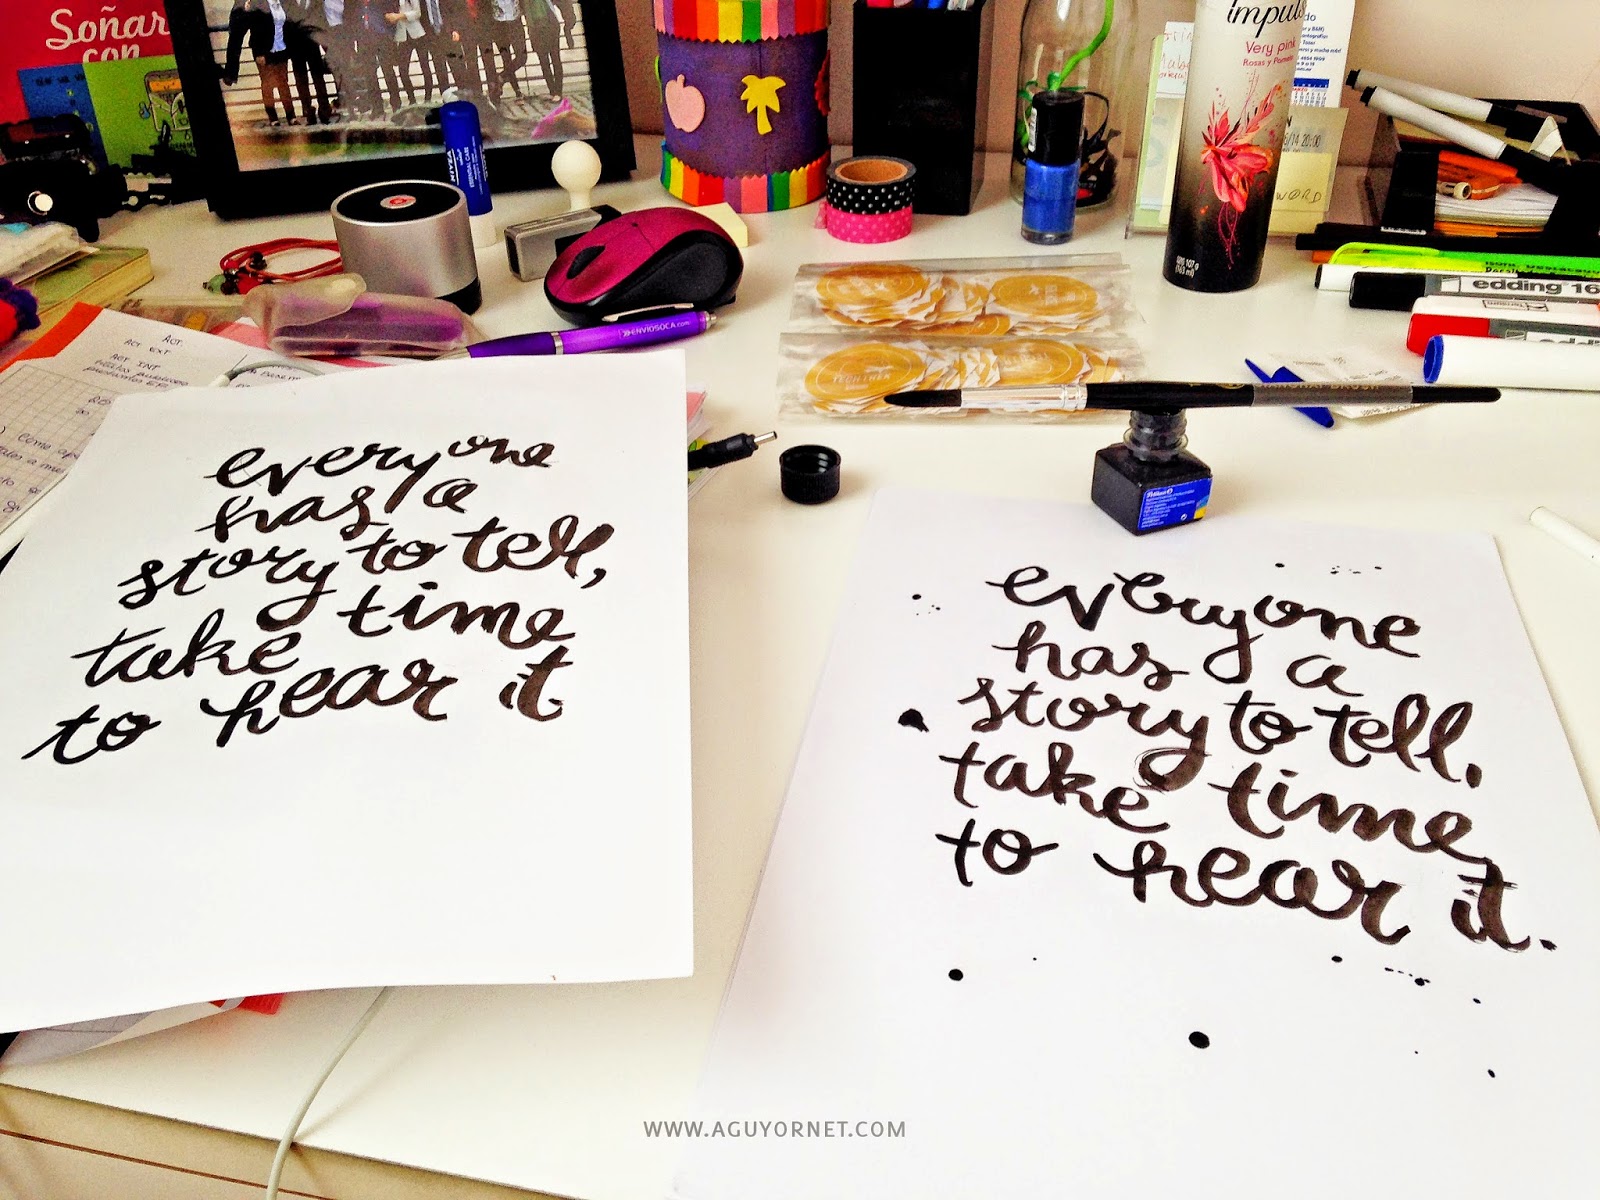
This is super easy and fast idea to make the perfect gift! The first thing you have to do is choose the quote you want and start writting in down, I use black ink and a brush, and regular paper. There is not much to explain here is just practice and do it over and over again until you like the result.

I wrote it down five or six times, and this two were my favorties. Sometimes one page never get to be perfect but as we are going to edit it latter you can have two and mix the letters/words you like of one with the other.

Esta es una idea super y fácil y sencilla para hacer un regalo, más que todo porque es super personalizable!

Lo primero que tienen que hacer es elegir la frase que quieren, y simplemente empezar a escribirla, yo use papel común de impresora, tinta china y un pincel. Y acá la verdad que no hay mucho para explicar es simplemente escribirlo una y otra vez hasta que estén satisfechas con el resultado...

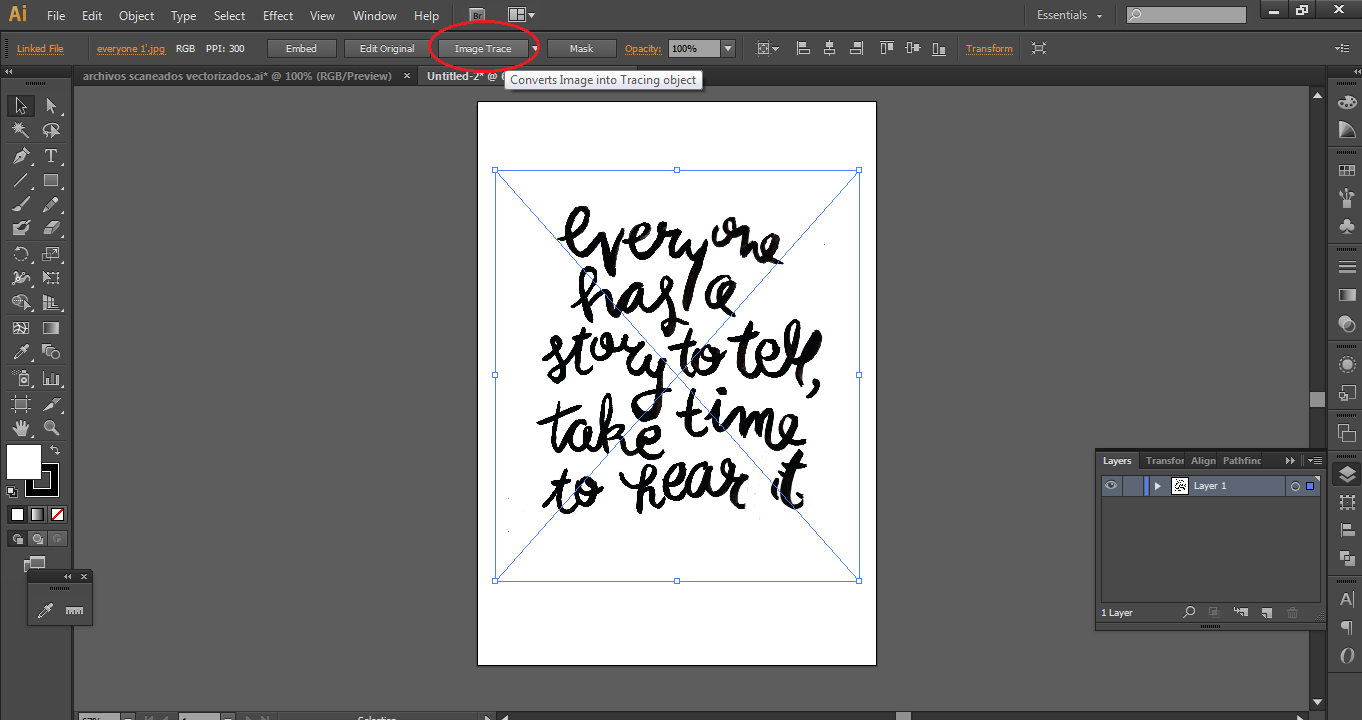
Brush letteringHere is when the magic happen, you scan both of the pages, and insert it into Adobe Illustrator. (If you have two pages you have to do it separately for both). First, you will need to create a new project at Illustrator with the size of your poster, and then go to, file> place> and select the image scanned. Once you have your image in Illustrator, selected and click on "Image Trace"

Acá es cuando la magia sucede! Una vez que lo scanean, abren Illustrator y crean un nuevo proyecto con el tamaño del poster, y después van a File > Place y seleccionan la imagen que acaban de escanear. Y este basicamente es un tutorial de como vectorizar imagenes, y porque es importante vectorizar se estarán preguntando! Pues la razón es que las imagenes vectorizadas no se pixelan, entonces si queremos imprimir con buena calidad y encima algo tan grande como un poster es más que esencial que este vectorizado!

Entonces una vez que tienen la imagen en illustrator hacen click en "Image Trace" 

Como vectorizar en adobe illustrator

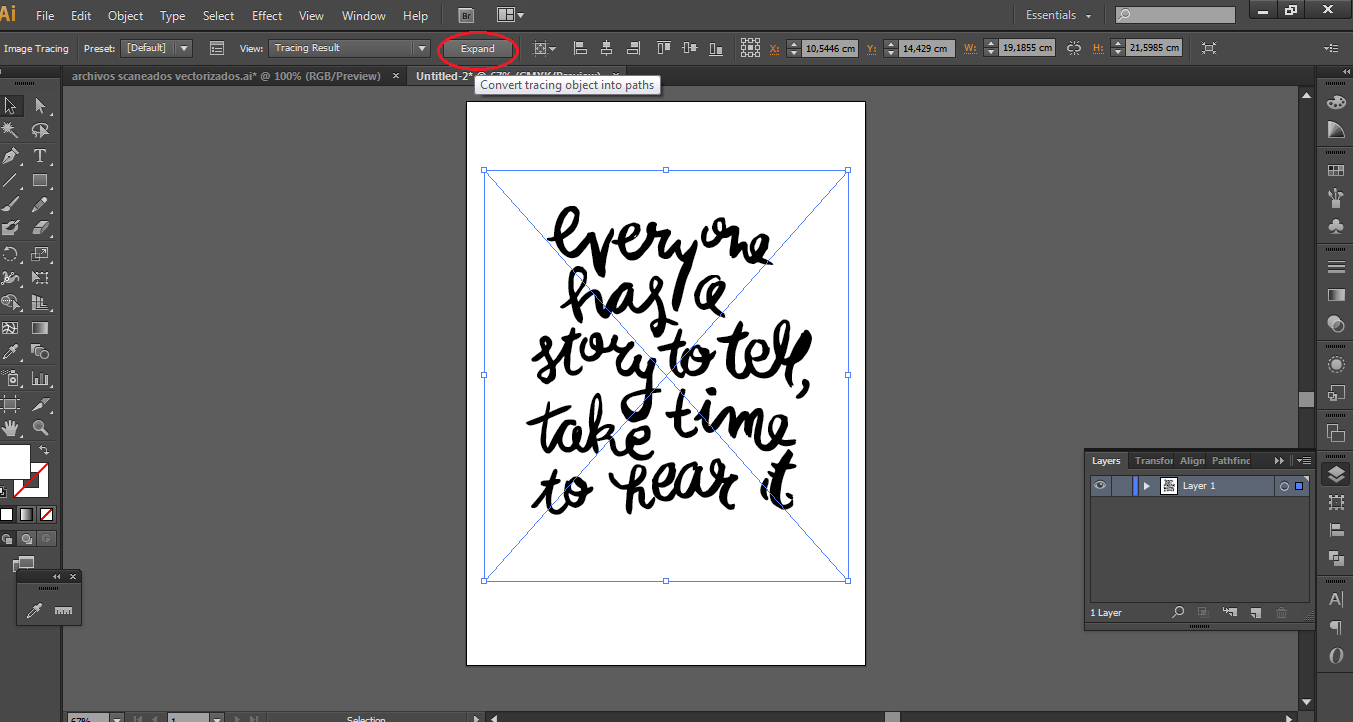
After that click on "Expand"
Después en "Expand"

Como vectorizar en adobe illustrator

Your image should look something like this, now everything on the image you scanned is a vector, even the white space.
Su imagen se debería ver algo como esto, eso quiere decir que todo lo fue scaneado en esta imagen ahora esta vectorizado, incluso los espacios en blanco.

Como vectorizar en adobe illustrator

So as we don't need the white space, only the black words, we are going to ungroup it, and start selecting the white part we don't want and delete them

2014


And when you realized, the year is over

6 years blogging and I right now I found myself guilty for not explaining you why I dissapear mostly half of the year... So as I love making summaries and lists, let's summaries my 2014 :)

1. SABF

Now, if you are reading this, and you are a university student, this might be really interesting for you! (really)

So, the South American Business Forum (SABF), is a conference organized by student for students, that take place in Buenos Aires, in August for three days and bring together 100 of the best students from all around the world. You can read more about and/or aplly here: http://www.sabf.org.ar/

This is how my year started, being part of the team that organize this conference, it was an intence year full of work, but a super amazing experience! If you has the chance to participate, it really change your life as a student!

sabf south american business forum student conference buenos aires itba
2. Tech Trek

While the whole organization of SABF was happening, I also was organizing a project I called "Tech Trek", do you remember last year I went to San Francisco? Well... I decided I wanted to go again but this time visiting tech companies, startups, accelerators and moe! Was a super exciting trip that last 10 days and visit 35 different companies! Pretty amazing trip :)

Silicon valley trip tech trek itba buenos aires

Google Bicycle in HQ San Francisco
Instagram HQ in San Francisco

3. University

But not everything was travelling this year... I also spend a lot of time studying, and I happy to said that I'm in third year of my studies :) 2 years from getting my degree!!

Study and travelling
4. TEDx / Capital Cities Concert

I think this year I trully enjoyed Buenos Aires in his maximan potencial  :) I get to attend Tedx Rio de la plata, that is the biggest TEDx in the world!! and it was amazing! If you dont know Ted Talks, they are like 10 minutes talk that really blow your mind, they are made by normal peopke who has a story to tell or are passionete about something. PS: they are addicting, so be careful lol

TEDx Rio de la Plata 2014 en Tecnópolis
I also went to more concert this year that in my whole life! I went to hear Jack Johnson, Capital Cities (my favorite band so far), on the summer I also went to the Ultra Music Festival, which amazing but pretty exhausting, and a couple more

Concierto Capital Cities en el Luna Park en Diciembre 2014
So yep, that was basically my year, was really really different from others, but I think one of the most amazing ones, and where I met the most incredible people!

Pases y tarjetas - Recuerdos
 So I'm super excited about this new year, but I don't know if can be as good as 2014 was :)

As, lot of things has changes around here, I will have a couple of different post soon!

So, what was your best moment of 2014??

Love, Agus


DIY Knitted Lamp


Hace tiempo por el blog de Vero Mariani, llegué a estas lamparas. Me encantó la idea que tenga el cable de color! y me quedé pensando en como podía hacer para hacer una parecida... En eso me acordé que de chica tenía un tricotin en el que tejía cordones de colores sin mucho uso...

Sometime ago I remeber seeing in Vero Mariani Blog, this lamps. I love the color cable! and I start thinking how I can do a similar one... Then I remember that when I was little I used to have a tricotin where I french knitted

DIY Knitted Lamp


Los materiales que use fueron: el cable y el portalámpara, un destornillador para poner el portalampara, lana, el tricotín y un crochet chiquito.

The things I used were: cable, a lampholder, a small screwdriver for the lampholder, the tricotin, wool and a small crochet


Siempre use el tricotín ya sea con lana sola, o hilo para hacer pulseras; pero pensando en esto se me ocurrió combinarlo con el cable... y efectivamente funcionó!

I always use the tricotin just with wool but this time thinking on the lamp I decided to mix both! and luckily it works perfect!

French knitting tutorial for making a knitted lamp
Pasé el cable por el medio y tejí alrededor normalmente como siempre, y de a poco iba saliendo el cable tejido :) muchó mas gordito y compacto por la lana que usé!

I pass the cable trough the middle and start knitting like usual, and slowly the cable come trough beatufly knitted :) much stronger because of the wool!

French Knitting tutorial to learn how to make a knitted lamp

Después cuando ya quise terminar, lo fuí cerrando (que es igual que cuando se teje pero dejas de pasar la lana, entonces te van quedando menos)

When I wanted to finish, I start closing it (is the same that when you knitt but without passing more wool)

French Knitting tutorial to learn how to make a knitted lamp

Cerramos y pasamos el tricotín hasta el final para sacarlo del cable

Once closed it, we pass the tricotin trought the cable to take it out.

French Knitting tutorial to learn how to make a knitted lamp

Así quedaría la punta donde empezamos que es donde vamos a poner el portalámpara normalmente

That is where we started, here you put the lampholder

French Knitting tutorial to learn how to make a knitted lamp


Espero que les haya gustado! y sepan que pueden compartir sus proyecto finales en mi fan page :)

I hope you like it! Remember you can always share you crafts with me in my fan page!

Lampara tejida con tricotin

Love, Agus

Photonica | Diseño gráfico y web
Copyright © Agus Yornet Blog