Showing posts with label crafts. Show all posts

How to do a hanging photo frame


So as you can tell from other post, I love paper photos and this is the reason two years ago I started printing them to put in this kind of analog instagram. Today I completed the final line of photos and I decided to share the final look!

The frame is made super easy with 4 stick of wood, two of 1,20 mt and two of 65 cm. Assamble together into a big frame and I made 8 holes in each side, plus 2 more on the top so I can hang it. Them I put a string and voila!


How do I print the photos?

I always loved polaroid photos so I started printing "polaroid like photos" using this template that is made for printing 6 photos of 6,5 x 6,5 cm in a big photo of 15x21cm. That's the method I use for the photos that I took with the cellphone or the camera (which are most of the photos)

However, a year ago I (finally) bought a Fujifilm Mini Instax 8. I must confess is super fun to take photos with the Fujifilm but I barely carry the camera around and I still can't manage to used correctly, I usually end up with photos that are too dark or to exposed (looking forward to make an upgrade on this camera soon!)

 Please lets talk about this damn beautiful copper wire lights that cost less than 3usd in Aliexpress. They are so delicate and warm looking, the use two small batteries so you can put it absolutely everywhere. This was my final touch for this frame


Hope you like it! Do you usually print photos as well?

Follow me of Facebook for updates 

Knitting project - Hat/Scarf - Entrelact pattern


Winter is coming and is time for knitting projects! It was some time ago that I get to know Skeino, they have some really nice knitting kits! This is one of them and it is a scarf that turns into a hat! Designed by Antje Gillingham for SKEINO, the kit comes with the instructions as well as with the yarn. (Friend advice: use the coupon code GUIDECENTRAL to get 10% off until November 1, 2015)


This pattern is call "Entrelac" and is one sided, it consists of a first road of triangles and then a second road of squares, just of one side of the triangles, and then other road of squares in the opposite direction. Here's how to begin: Row 1 (right side) - K1, turn. Row 2 (wrong side) - Purl 1 (P1), turn. Row 3 - Slip (SL) 1 knitwise (KW), K1, turn. Row 4 - P2, turn. Row 5 - SL 1 KW, K2, turn. Row 6 - P3, turn. Repeat rows 5 and 6, adding 1 more knit SL for every right side row until you've worked 8 stitches, ending with row 5. Don't turn your work, place your marker, repeat from row 1, 12 more times.

You can choose between many different high quality yarns. This colorway is called "Port Allen".


Craft Tip: Embossing Powder


Solo iba a publicar la última imagen de este post que era un pequeño truco que siempre uso para derretir el embossing powder... Pero después pensé que mejor explicar todo, porque para algunos sera algo obvio pero al menos para mi cuando lo conocí fue como todo un descubrimiento! (Así que si ya sabes que es solo pasa a la última parte)

I was just going to share only the last photo of this post but I decided I should explain what is Embossing powder, that it might sounds obvious for some but not for others, and if you dont know yet what it is you have been missing all the fun of crafting!

Bueno, entonces que es el "Embossing powder", basicamente es plástico en particulas muy muy chiquitas que se ve como polvo, entonces la gracia es que cuando lo calentas se derrite y tiene un efecto brilloso y queda super fijado al papel. Para estampar con embossing powder van a necesitar un sello, y un emboss ink pad que es como un ink pad de pegamento!

So Embossing powder basically is plastic made powder, so when you heat it, it melts, creating a really pretty effect in paper. So is perfect for stamping, to stamp it you will need "Emboss ink" that is like glue in an ink pad.

Una vez que lo estampan con el emboss ink pad, le tiran el embossing powder, y después sacan el excedente con un golpecito

You will need to stamp your stamp with this ink, then add the powder and remove the excedent

Les queda algo así que si lo ven de cerca se ven las bolitas que les digo.

See what I was taking about before? there you can see the tiny particles of plastic


Entonces, el primer paso es estampar, después le tiramos el powder y ahora viene la parte divertida que es aplicarle calor! Generalmente se hace con una pistola de calor, pero ahora más abajo les explico la otra manera!

The third step is heating this, is usually done with a heating gun, but they are quite expensive, here is where my trick come!


Ahora que ya lo calentaron se debería ver algo así, y tiene un aspecto brilloso


Y si no tienen un pistola de calor como yo lo pueden hacer en la hornalla de su casa, con un DIFUSOR DE CALOR que es el que se usa para la pava y lo sostienen despacito con una pinza mientras se derrite (seran 2 minutos como mucho, es super rápido)

Instead of a heating gun you can use a heat diffuser in your kitchen, and in a few minutes you have a perfect embossing!


Yo desde que descubrí que existe esto lo uso siempre en las tarjetas porque queda un resultado mucho más prolijo y lindo, hay algunos powders que cuando los calentas se hacen tornasolados, otros que son metalizados! así que hay muchas opciones para divertirse :)

I love using this technique when cardmaking and scrapbooking (every time I stamp actually...) because it gives the stamping a much better result and resolution, moreover there are so many different embossing powder, my favorites are gold and silver that give you real metallic results!

Espero les haya resultado útil!

I hope you found it useful this little trick!

SUPPLIES:

Taking care of brushes / Cuidado de Pinceles


Yo fuí a un taller de pintura por 13 años, la misma cantidad de años que toda la escuela primaria y secundaria. Eso es, muchoo tiempo. Y cuando llegaba Diciembre y era época de vacaciones, era el momento de llevarme mi caja de pinceles del taller a casa, para hacerle un service a todos los pinceles que trabajaron todo un año y queden listo para otro año intensivo de pintura.

I went to painting school for 13 years, that's the same amount of years as primary and high school together, a lot of time!. And when it come to December, I remember it was time to take my brush's box from the studio and bring them home, so I can do them a full "servis" and let all set up for next year

 Y esto como empezaba? Lo primero que hay que hacer es limpiarlos bien con jabón blanco para ropa, para que todo resto de pintura se vaya (yo pintaba en óleo, así que considerando que ya sacamos todo lo que se podía sacar con aguarrás)

This were the step I follow: First I started cleaning it with whitesoap (the same you use to wash cloth), with this the idea is to get rid off all the paint left it has (I used to paint with oil paint)

Una vez que están bien limpios en una olla con agua hechar un buen chorro de vinagre, y poner a hervir todos los pinceles. Dado que el vinagre tiene feo olor y estamos encima hirviendolo, haganlo con las ventas abiertas o si pueden mejor afuera...

Once they are clean, in a saucepan with water add a small amount of vinegar, and put your brushes until it boils. But dont get you eyes off them and move the brushes for time to time, because we dont want them to get burn with the bottom of the saucepan!

Ponemos todos los pinceles ahi hasta que hierva y después lo sacamos, muevanlos un poco no queremos que se quemen todos en el fondo de la cacerola...

Cuando los sacan los enjuagan con agua y ahora tenemos los pinceles super limpios y con las cerdas super suaves pero que tienen un aspecto similar a este:

When the water with vinager boils, take the brushes away, clean it with water, and now you have super clean and smooth brushes that look something like this...

Entonces queda devorverle la forma, lo mojamos un poco y con un servilleta lo envolvemos lo más apretado podemos, y así lo ponen debajo de algo pesado, una caja, una enciclopedia, etc.

So now is time to give it shape, moisten the point of brush with water and with a tissue paper wrap it as tight as you can, and leave under something heavy like a box or a encyclopedia.

Después de uno dos días, lo sacan de ahí, le sacan el papelito y deberían haber quedado como nuevos otra vez :) Sino lo pueden hacer otra vez, y dejarlo unos días más

After one or two days, when you unwrap it they should have a nice shape, if not do it once again for a few more days.

Un buen tip, es que cada vez que laven sus pinceles y estén por guardarlos para que les quede una punta perfecta, hagan este gesto con la mano y que les queda perfecto.

A good trick: after every time you clean your brushes you can give it a perfect shape with your hand like this:

Espero que les sea útil! Le pueden alargar la vida varios años a sus pinceles así :)
Tienen algún truco ustedes?

Hope you find it useful! and if you have any trick to take care of your brushes please share it with me in the comments :)

Love, Agus 

Como hacer un Poster personalizado / DIY Custom Poster


In the last couple of moth I have been obsessed with calligraphy, as I got few time during the day because of my studies, calligraphy is the one thing that require so few things and is so satisfing and beautiful (at least for me...)

The other day I post this image on Instagram, and yep... most of my study break end up at something like that...

So one day I was really hurry for making a birthday gift I have in few days, I wanted to do something really representative... and I has this quote that I think really identify my friend and decided to make it into a poster...

Ultimamente he estado obsesionada con la caligrafía y debido que generalemente tengo poco tiempo durante el día porque me la paso todo el día en la facu o en casa estudiando, la caligrafía es de esas cosas tan lindas que requieren tan poco con un papel y una lapicera ...

El otro día publiqué esta foto en Instagram por ejemplo... sip... así terminan la mayoria de mis cuadernos cuando estudio jaja.


How to make a Custom Poster


This is super easy and fast idea to make the perfect gift! The first thing you have to do is choose the quote you want and start writting in down, I use black ink and a brush, and regular paper. There is not much to explain here is just practice and do it over and over again until you like the result.

I wrote it down five or six times, and this two were my favorties. Sometimes one page never get to be perfect but as we are going to edit it latter you can have two and mix the letters/words you like of one with the other.

Esta es una idea super y fácil y sencilla para hacer un regalo, más que todo porque es super personalizable!
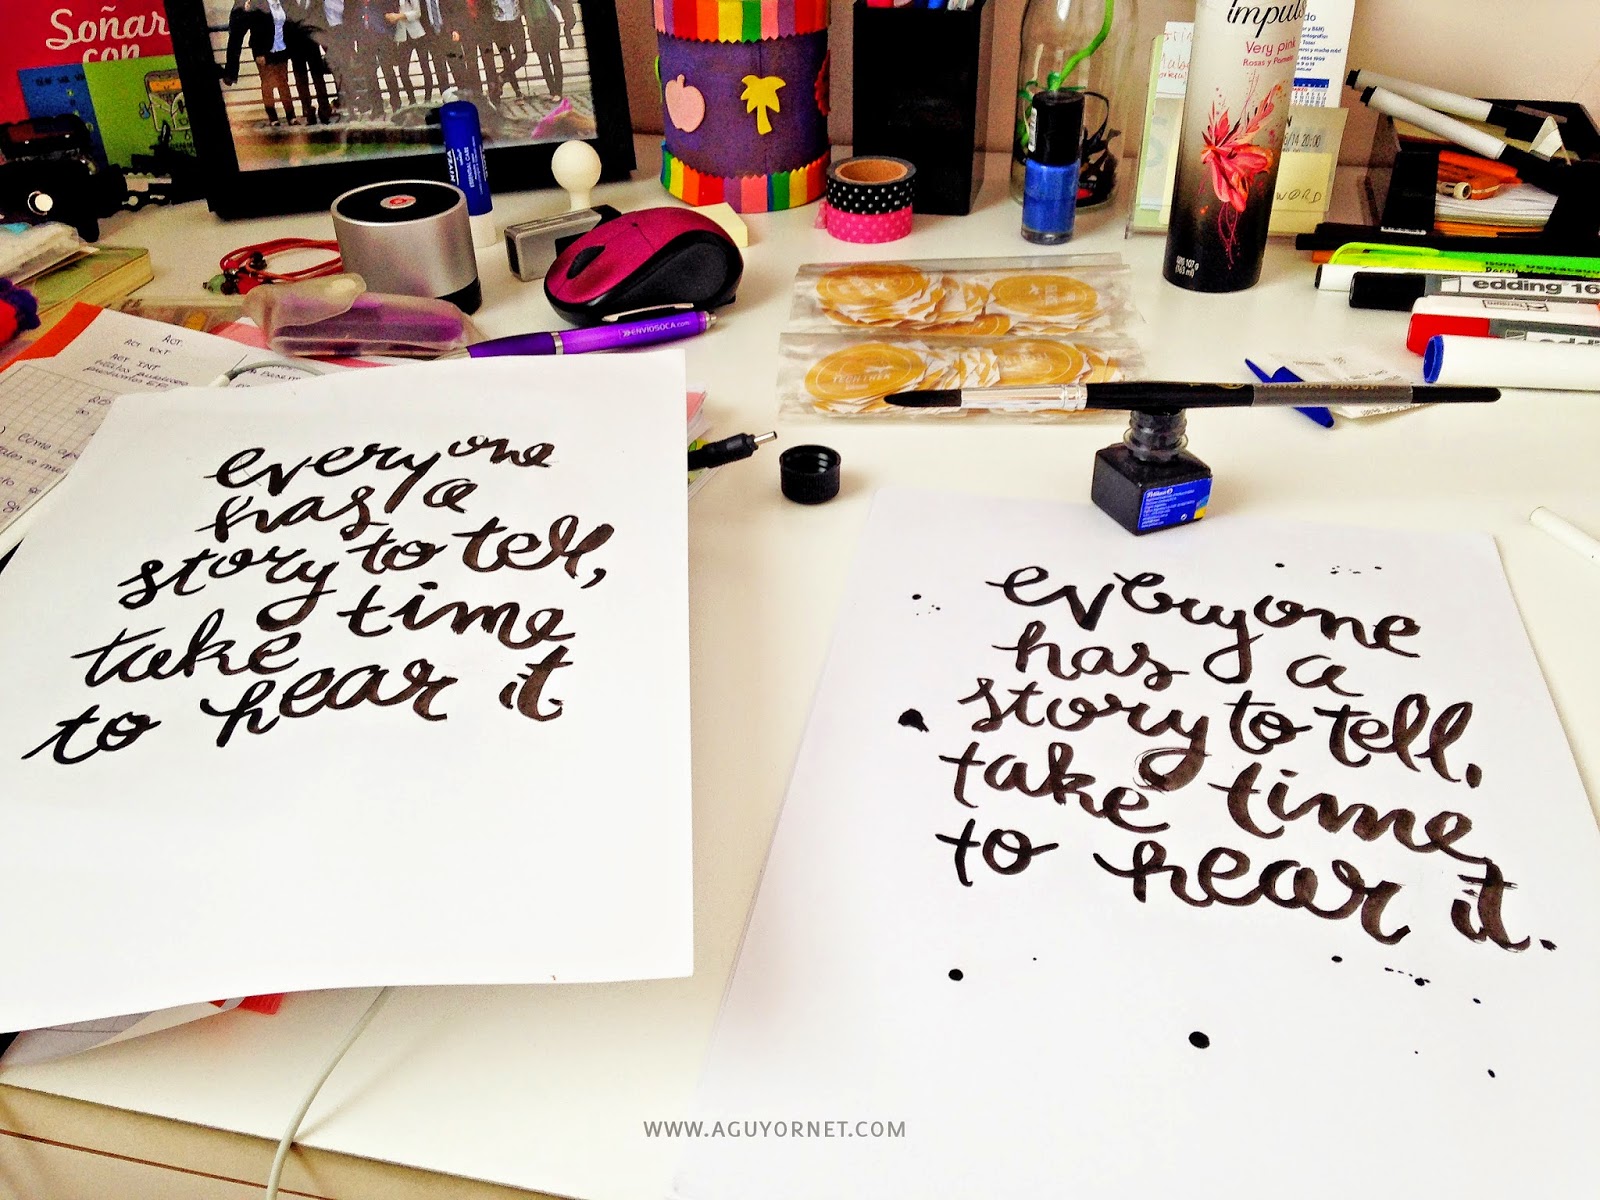
Lo primero que tienen que hacer es elegir la frase que quieren, y simplemente empezar a escribirla, yo use papel común de impresora, tinta china y un pincel. Y acá la verdad que no hay mucho para explicar es simplemente escribirlo una y otra vez hasta que estén satisfechas con el resultado...

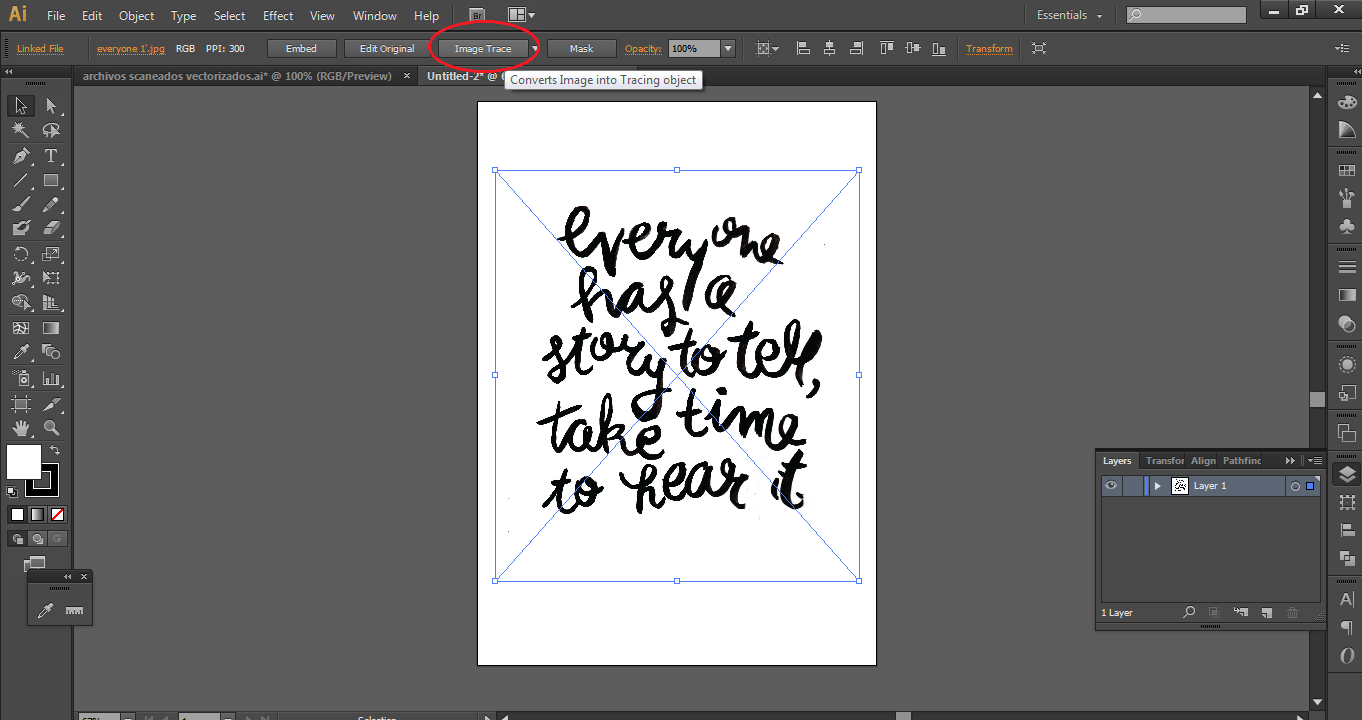
Brush letteringHere is when the magic happen, you scan both of the pages, and insert it into Adobe Illustrator. (If you have two pages you have to do it separately for both). First, you will need to create a new project at Illustrator with the size of your poster, and then go to, file> place> and select the image scanned. Once you have your image in Illustrator, selected and click on "Image Trace"

Acá es cuando la magia sucede! Una vez que lo scanean, abren Illustrator y crean un nuevo proyecto con el tamaño del poster, y después van a File > Place y seleccionan la imagen que acaban de escanear. Y este basicamente es un tutorial de como vectorizar imagenes, y porque es importante vectorizar se estarán preguntando! Pues la razón es que las imagenes vectorizadas no se pixelan, entonces si queremos imprimir con buena calidad y encima algo tan grande como un poster es más que esencial que este vectorizado!

Entonces una vez que tienen la imagen en illustrator hacen click en "Image Trace" 

Como vectorizar en adobe illustrator

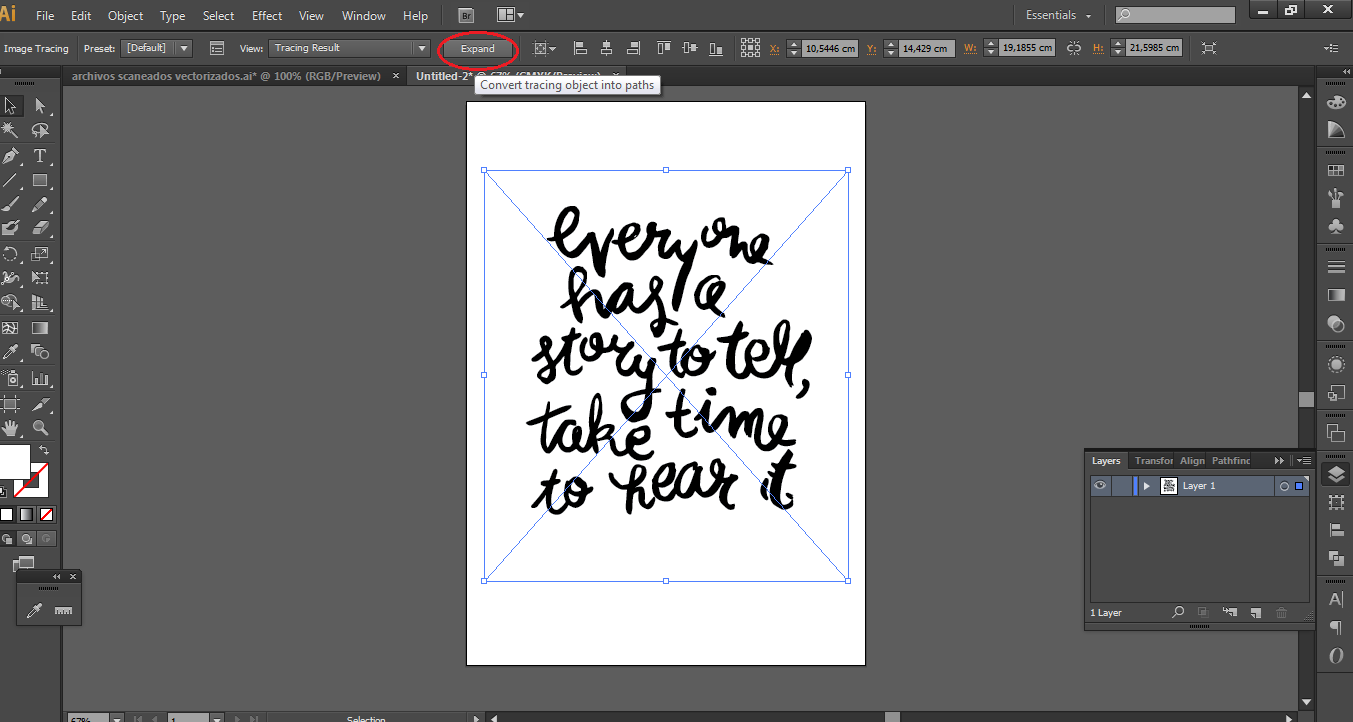
After that click on "Expand"
Después en "Expand"

Como vectorizar en adobe illustrator

Your image should look something like this, now everything on the image you scanned is a vector, even the white space.
Su imagen se debería ver algo como esto, eso quiere decir que todo lo fue scaneado en esta imagen ahora esta vectorizado, incluso los espacios en blanco.

Como vectorizar en adobe illustrator

So as we don't need the white space, only the black words, we are going to ungroup it, and start selecting the white part we don't want and delete them

DIY Knitted Lamp


Hace tiempo por el blog de Vero Mariani, llegué a estas lamparas. Me encantó la idea que tenga el cable de color! y me quedé pensando en como podía hacer para hacer una parecida... En eso me acordé que de chica tenía un tricotin en el que tejía cordones de colores sin mucho uso...

Sometime ago I remeber seeing in Vero Mariani Blog, this lamps. I love the color cable! and I start thinking how I can do a similar one... Then I remember that when I was little I used to have a tricotin where I french knitted

DIY Knitted Lamp


Los materiales que use fueron: el cable y el portalámpara, un destornillador para poner el portalampara, lana, el tricotín y un crochet chiquito.

The things I used were: cable, a lampholder, a small screwdriver for the lampholder, the tricotin, wool and a small crochet


Siempre use el tricotín ya sea con lana sola, o hilo para hacer pulseras; pero pensando en esto se me ocurrió combinarlo con el cable... y efectivamente funcionó!

I always use the tricotin just with wool but this time thinking on the lamp I decided to mix both! and luckily it works perfect!

French knitting tutorial for making a knitted lamp
Pasé el cable por el medio y tejí alrededor normalmente como siempre, y de a poco iba saliendo el cable tejido :) muchó mas gordito y compacto por la lana que usé!

I pass the cable trough the middle and start knitting like usual, and slowly the cable come trough beatufly knitted :) much stronger because of the wool!

French Knitting tutorial to learn how to make a knitted lamp

Después cuando ya quise terminar, lo fuí cerrando (que es igual que cuando se teje pero dejas de pasar la lana, entonces te van quedando menos)

When I wanted to finish, I start closing it (is the same that when you knitt but without passing more wool)

French Knitting tutorial to learn how to make a knitted lamp

Cerramos y pasamos el tricotín hasta el final para sacarlo del cable

Once closed it, we pass the tricotin trought the cable to take it out.

French Knitting tutorial to learn how to make a knitted lamp

Así quedaría la punta donde empezamos que es donde vamos a poner el portalámpara normalmente

That is where we started, here you put the lampholder

French Knitting tutorial to learn how to make a knitted lamp


Espero que les haya gustado! y sepan que pueden compartir sus proyecto finales en mi fan page :)

I hope you like it! Remember you can always share you crafts with me in my fan page!

Lampara tejida con tricotin

Love, Agus

Origami Envelope Tutorial


Lately I had been obssesed with this envelope! I find it so pretty and useful! And I love the fact is super simple to make because you only need one paper:

I used an A4 page but it can be any rectange size...


And finally to keep close you can add a sticker in the middle :)

 I hope you like it as much as I do!!
Love, Agus

DIY: Enamel Dots


 I found enamel dots being so trendy right now! They make such a pretty and easy embellishment to use in cards, LO or any crafts! Unfortunatly I couldn't get any in my country so I figure it out a way to make my owns
Veo cada vez más que se usan los enamel dots para todo! Me encantan como embellishment porque va bien con todo, pero desafortunadamente no lo venden acá en Argentina, así que se me ocurrió una idea para hacerlos uno mismo!


 I used a glue gun and made this little glue dots, it took a bit of practice until you get the perfect dot...
Use una pistola de pegamento para hacer las bolitas, al principio no salen tan redondas pero después con un poco de práctica van saliendo


Then you just need to paint the back using any acrylic paint
Y después con acrílico pinté la parte de atrás


Let it dry and you are done! look how pretty they look :) 
Las dejas secar  y quedan perfectas!

 What do you think about making your own enamel dots?
Que les pareció? Recuerden que pueden compartir sus proyecto finales en mi página de face!

 Don't forget to follow me on Insta for sneak peeks, on Facebook for news and you can also subscribe to my newsletter for update of new posts!
 No se olviden de seguirme en Insta para sneak peeks, en Facebook para noticiasy y también se pueden subscribir a mi newsletter para updates de posts nuevos!

ENTER TO THE CAMERA STRAP GIVEAWAY [HERE]

Love, Agus

Photonica | Diseño gráfico y web
Copyright © Agus Yornet Blog